If you are interested in making beautiful custom data visualizations for the web, D3 and SVGs work great together. Both SVGs and D3 support interactivity and animation, offering a ton of flexibility to create unique interactive applications.
Future posts will describe how to load and modify external SVGs with D3, but there are important steps that need to be taken during the design process to create manageable, web friendly vector graphics. For this post, I will be focusing on how to convert
and prepare raster drawings from Procreate using Adobe Illustrator.
What is Procreate?
Procreate is one of the most powerful and intuitive illustration apps on the market designed for the iPad. It allows designers to 1) interact with their artwork using touch or 2) use the Apple pencil for extra precision. Procreate offers fantastic illustration
tools like customizable brushes, drawing guides, and personalized color palettes. As a digital drawing tool it has an advantage over traditional pen and paper when it comes to producing cleaner artwork and providing easy synchronization with desktop
apps. Plus, compared to most desktop applications, Procreate is inexpensive.
The app store has more details on some of the specific tools Procreate offers.
What will you get from this post?
This post covers everything from planning your design to cleaning up your exported SVG with a code editor. It contains a step by step guide on how to convert raster drawings from Procreate into vectors using Illustrator’s image trace. A lot of the advice
is not required, but it will make integration with code much easier and help optimize web performance.
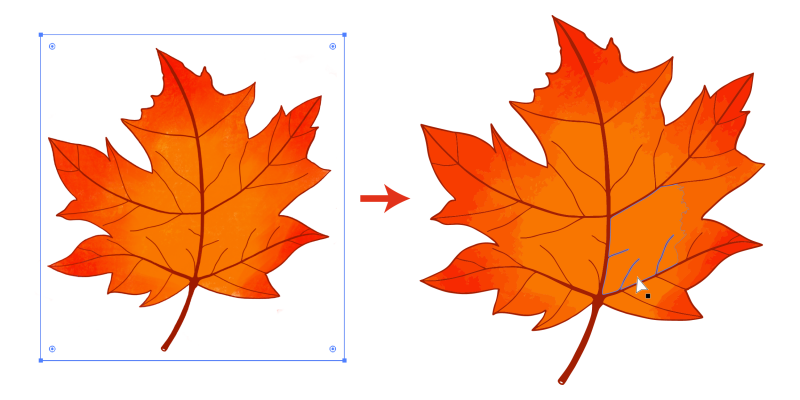
I started with a raster drawing from Procreate that did not allow for easy animation and manipulation (left) and ended with an organized SVG with easy to manage shapes (right).
Note 1: SVGs are really only needed in instances when you want to modify individual layers inside the artwork. JPGs or PNGs will work for basic interactivity.
Note 2: If you would rather keep your workflow on the iPad, consider using Affinity Designer. I won’t cover instructions here, but it is an excellent vector program on the iPad at a similar price point as Procreate.
Note 3: Readers looking for a free alternative to Illustrator may want to look at Inkscape. Inkscape has a bitmap tracing tool that is similar to Illustrator’s image trace.
Tools you will need
- Procreate (version 4.2.5 as of this writing)
- Adobe Illustrator CC
- Your favorite text editor (For cleanup. I am using Atom.)
Table of Contents
- Prepare your illustration
- Save file and send to Illustrator
- Vectorize artwork in Illustrator using image trace
- Manually clean up tracing result
- Organize Layers
- Export SVG
- Clean up file in text editor
- Summary
Prepare your illustration
The first thing you’ll need to know is how to prepare your drawing for Illustrator.
Open a new Procreate file. The exact size isn’t important, although a large, high resolution image will produce a better trace later. While drawing:
- Plan ahead: As with any animated or interactive graphic, think about what you want to modify before you begin drawing.
- Separate shapes using color: When you use image trace, connected shapes of the same color will be merged into one large shape. Avoid using fills that are the same color as your outline and leave space between your shapes.

I want to change the pants color with D3 so I should give the pants a different fill from the outline. - Use unique colors for unique shapes: This will make grouping easier later. You can always change the colors back once shapes have been separated onto their own layers.

- Kill your darlings: Recognize that the more details you have in your illustration, the larger the file will be. Painterly brushes, intricate lineart, and full color palettes will add paths to your file, so be thoughtful when deciding to use
them.
- Create enclosed shapes for easier editing: Using enclosed shapes will make it easier to apply fill colors once your image is vectorized.
- Separate overlapping components: In some instances, you will want parts of your design to overlap. Draw your shapes on separate Procreate layers and save the layers individually, or if you want to reduce the number of files, drag the elements
to different parts of the canvas (without resizing) and save. I want to change the characters’ arms and hairstyles. I can draw the different hairstyles on their own layer in Procreate (top), then either save each layer separately or keep everything in one file by dragging them to different parts of the canvas.
The layers can be joined back together in Illustrator (bottom).
- Clean up your drawing: The fewer extraneous strokes, paths, or pixels, the better the trace. Clean, smooth outlines will almost always produce smaller files than rough, sketchy lines.


Save file and send to Illustrator
Once you’ve finished drawing, follow these steps to save your file and send it to Illustrator.
- Turn off background layer

- Select wrench icon in top left-hand toolbar

- Select share

- Select PNG in dropdown to keep transparency

- Send the file to your desktop


Vectorize artwork in Illustrator using image trace
The goal here is to produce the smallest file size that still resembles the original artwork.
Download the PNG and open or place it in an Illustrator file. Turn on the image trace panel (window > image trace).

Image trace settings
-
- Threshold: specifies a value for generating a black and white tracing result from the original image. All pixels lighter than the threshold value become white; all pixels darker than the threshold value are converted to black.
- Palette: specifies a palette for generating a color or grayscale tracing result. The more colors you use, the larger the file will be.
- Full tone: uses the entire set of colors
- Limited: offers the narrowest range of colors
- Automatic: will pick between full tone and limited
Under the “advanced” drill dropdown:
- Paths: Selecting a low value will make the paths fit looser to the original shape, resulting in fewer anchor points. A high value will make the path fit tighter to the original shape, resulting in more anchor points.
- Corners: A higher value will add more sharp corners, a lower value will create more smooth curves.
- Noise: The minimum number of pixels needed for an area to be included in tracing. This excludes unwanted content like dust, spots, or in our case extra pixels created from artsy Procreate brushes. Selecting a higher value results in less noise
and a more detailed trace.
If you’re interested in learning more about these settings, Adobe has details here.
Different strokes for different folks
Every project is different, and the settings you choose will vary depending on your needs. I came up with a few approximate guidelines for different types of drawings, but you will likely need to adjust.
Check the preview box to get a live look at your image in vector format. Since preview will slow down rendering time, follow these guidelines first and then tweak your settings with preview selected.

Smooth black and white outline drawing
Resulting file size: 15KB
- Mode: black and white
- Threshold: medium
- Paths: low to medium
- Corners: high
- Noise: low

Rough, color outline
Resulting file size: 215KB
- Mode: color
- Palette: limited
- Colors: 2
- Paths: high
- Corners: high
- Noise: low

Simple outline and flat fills
Resulting file size: 130KB
- Mode: color
- Palette: limited
- Colors: 5
- Paths: medium-high
- Corners: medium
- Noise: low

Simple outline and painterly fills
Resulting file size: 200KB
- Mode: color
- Palette: limited
- Colors: 8
- Paths: low to medium
- Corners: high
- Noise: high

Paintings without outlines
Resulting file size: 305KB
- Mode: color
- Palette: automatic
- Colors: 20
- Paths: low
- Corners: low
- Noise: low
Note: It is okay to have detailed illustrations in your application, but be mindful about when these types of drawings will be appropriate. Limit the amount of images that are over 300KB in your application.
Manually clean up tracing result
You may need to clean up your file to reduce the size and make it more manageable.
Expand your tracing result
Press expand to convert the tracing object to paths. Make sure you are satisfied with your tracing result as you won’t be able to change your settings after this step.
Ungroup the shapes
When the paths are expanded they will initially be grouped together. Use Cmd/Ctrl + Shift + G to ungroup so you can edit the shapes.
Remove white background
If you didn’t select “remove white” in the image trace settings, use the direct selection tool to select and remove the white background. Depending on your design, some parts of the background might be closed off and will need to be removed individually
with the direct selection tool.
Remove extra paths
Using the selection and direction selection tools, target extraneous paths to delete them.
Organize layers
Move shapes that you want to modify onto their own layers. You can use the direct selection tool to select unique colors then use select > same > fill color to target all of the shapes with the same appearance. You can then copy the selected
shapes (cmd/ctrl + C), delete them from the old layer, and paste in place (cmd/ctrl + shift + v) on a new layer. Repeat this step on a new layer for every shape you want to modify.

Use the direct selection tool to target one shape, then select > same > fill color to target all of the same color shapes.
Limit groups
For every group, there will be an additional 2 lines of SVG code. Focus on organizing the parts of your graphic that will be modified and leave static layers alone.
Export SVG
You can save yourself a lot of future work by choosing the right settings.
Export options
- File > Export > Export as
- Give your file a name and select “SVG” from format dropdown
- Make sure “use artboards” is deselected
SVG Options
- Font = SVG
- Images = preserve
- Object IDs = Minimal
- Select OK
Clean up SVG markup in text editor
There are a few ways we can still edit the SVG file to reduce the size. This will also make the file easier to maintain and prevent CSS conflicts. This step isn’t entirely necessary, but it will make integrating your SVG with D3 much easier. If you
are comfortable doing so, open your file in a text editor. I use Atom, but use whatever works for you.
Illustrator may export unnecessary markup that can be removed. Some things to look out for are:
XML tag
<?xml version="1.0" encoding="UTF-8"?><svg> version Attribute
Browsers ignore the version attribute so it can be removed
This is different from the namespace, which looks something like xmlns="http://www.w3.org/2000/svg". The namespace should be kept as is.
<title> tags
You may decide to keep the title for accessibility purposes. If so, you should provide a better title than the one given by Illustrator (which will just be the file name).
<title>simple-outline</title>Clean up IDs
Illustrator layers will be saved as IDs upon exporting. To avoid CSS conflicts, convert the IDs you’d like to keep (these will probably be the layers you created in Illustrator) to classes, and remove the unimportant tags. Do keep the ids that are inside
the <defs> tag however, although you may want to name them something more useful than what is the default.
That’s it!
We’ve made it through one of the most difficult parts of creating interactive graphics (in my opinion)! Now that you have designed, exported, and optimized your svg for the web, it can be imported with D3 and we can begin adding animations and interactivity!
Hey, Sara!
Thank you for this detailed guide! I studied many new things for me. We also create static illustrations for our website (you’re welcome to check). Adding animation and interactivity is our next step.
P.S. I noticed some of the images in this post are blurred. When I open them in a new window, they’re ok. Please check.